Last time we visited I began the arduous task of cataloging everything necessary to combine a Ford 5.0 engine with a BMW E36. This week we skip the snappy intro and get right into it.

As an Amazon Associate I earn from qualifying purchases.
Controls
The controls section breaks down into four main ways that the driver interacts with the powertrain: throttle, clutch, shifter, and steering. Starting at the throttle pedal, I snipped off the end of the BMW throttle cable that interfaces with the pedal. I grabbed an Explorer 5.0 throttle cable from the junkyard (because my engine didn’t come with one) and snipped off its pedal end, then connected the two cables together between the pedal and firewall with a small brass splice.

Because I yanked off the stock Explorer intake elbow and its associated throttle cable bracket and also rotated the throttle body for better underhood clearance, I fabbed up a new throttle cable bracket using some angle iron and part of the original bracket. With that installed, I was able to determine the stroke of the throttle and adjust the pedal stop so that I wouldn’t stress the cable every time I mashed the gas, which would hopefully be ALL THE TIME.

The clutch was a little bit trickier. The E36 uses a hydraulic clutch master cylinder, but the Mustang T5 was always cable-actuated. There exist kits to convert the T5 to hydraulic actuation but they can get pricey, even on the low end. To add complication, my ’94-’95 V8 bellhousing puts the fork at a slightly different angle than the ’93 and earlier units, meaning the T5 external slave brackets don’t work for me. So I ordered a slave cylinder from a Datsun 280Z, grabbed some 3/16″ plate left over from building my engine mounts, and got to work. I attached it at three points and braced it for stiffness.

Fully welded.

In place with the slave installed.

I welded a small spacer into place on the clutch fork to capture the slave’s pushrod while still allowing articulation.

To connect the BMW master to the Datsun slave, I used the following pieces:
- -3/10mm banjo adapter
- 10mm banjo bolt
- -3 teflon-lined braided hose
- -3 to 10mm female bubble flare fitting
The BMW clutch line gets disconnected at the bracket on the transmission tunnel and then those pieces listed above mate the stock hard line to the new slave.


Boom. Clutch.
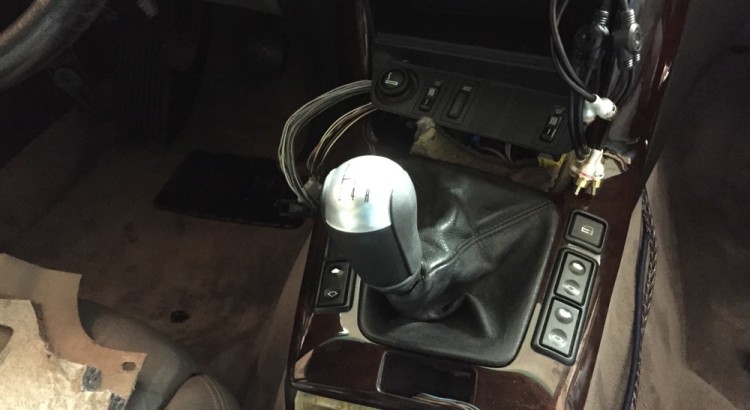
The shifter was surprisingly easy, I got lucky with where it landed on the chassis.

The stock V6 Mustang shift lever would hit the BMW’s fancy kind-of-looks-like-wood-but-you’re-not-fooling-anyone trim pieces, and we can’t have that, so I chopped the shift lever up and used some more of that trusty 3/16″ steel to make a new lever.


The lever is capped off with the stock boot and a Genuine™ Ford™ Parts™ shift knob™ from an ’05-’08 Mustang GT.

Gettin’ shwifty.
Steering
Some swappers have mounted the BMW power steering pump onto the 5.0 by making their own bracket – I decided to keep the Ford pump in the stock location, allowing me to keep the Ford reservoir and leaving open the option for A/C in the future.

So I chopped off the banjo fitting on the BMW rack-end hose, yanked the Ford hose coming out of the pump, and took them both into a local hydraulic hose maker that confirmed over the phone they were certified to make power steering hoses – apparently not all shops are supposed to make high pressure automotive hoses.
I arrived and showed him what I brought, and he was able to match the BMW banjo fitting with one of his own, but he didn’t recognize the Ford/Chrysler/GM standard power steering o-ring fitting. I suggested he just crimp something to the stock hose, which didn’t go over well. Apparently as a rule they don’t crimp high pressure fittings onto 18-year-old hoses of unknown origin; something about liability, flammable fluids, explosions, and high pressure injection injuries (don’t Google Image Search that).
When I asked if they knew of any less reputable shops that would toss caution (and liability) to the wind and make the crimp for me he relented and, after making me promise that I wouldn’t hold him liable for injecting my hand with power steering fluid and being forced to amputate one of my top 5 favorite appendages, he made the hose by crimping a standard fitting onto the end of the Ford hose then made up a second hose with a compatible fitting on one end and the correct size banjo on the other for the BMW rack.

For hood clearance, I had to lower the reservoir and bend down the Ford hose just a bit.

I connected the outlet of the stock BMW power steering cooler to the return line on the Ford reservoir with another barbed fitting and some hose clamps. Because this is the low pressure side, a barbed fitting and hose clamps are fine. DON’T TRY THIS ON THE HIGH PRESSURE SIDE.

Circuit complete.
There’s an alternative option for the high pressure side if you can’t find a shady hydraulic shop.
Just use these fittings:
- 16mm banjo to -6 AN adapter on the rack,
- a power steering to -6 AN adapter on the pump,
- a couple of -6 AN 90 degree fittings,
and then measure to find a simple -6 AN hose of the right length to connect the two. Circuit complete.
Speaking of circuits…
Electrical
With the BMW engine out of the engine bay, I took a hacksaw to its wiring harness to release all of the connectors, the under-cowl wiring box, and the ECU.

I dug into the under-cowl wiring box and pulled out every wire going to the old engine, intending to keep the BMW ECU in case it’s needed for any ancillary systems. I punched a hole in the firewall to begin running wires to the new ECU.

With the V8 in the car, I mounted another bracket and a couple of WeatherPak connectors to the firewall.

And commenced running wiring from the connectors, through the under-cowl box, and to the engine.


This is where splurging $160 for the DIYAutoTune wiring harnesses was well worth the extra expense. Every wire is both color coded and printed with the circuit name every few inches. If I had made the DB37 connectors myself, I would have ended up with like 26 different plain black wires with no idea what any of them did.
I added a small fuse box to add circuits for the ignition coils and the injectors.

In stock form, the M3’s battery is in the trunk with a nice, thick gauge power wire running to a distribution box in the engine bay. The heavy power wire from the alternator runs under the intake and lands on the distribution box. The same goes for the starter. Both are visible in this picture:

Here’s a fantastic description of alternator function, he does a much better job than I could of explaining (and understanding, frankly) how alternators work. Based on that and the following wiring diagram for the 5.0’s alternator, I hooked up the two remaining alternator wires.

The yellow/white “sense” wire goes to my little fuse block and sees voltage from the ignition key. The light green/red indicator wire goes to the blue alternator wire in the under-cowl wiring box. This pushes the circuit through the indicator in the instrument panel.
To bypass the BMW EWS anti-theft box, I tapped directly into the wires coming off of the ignition switch at the steering column and from there ran wires for the accessory, run, and start positions to the MegaSquirt and the engine bay. The interior accessories and Megasquirt come on in the first position, the engine accessories and wideband are powered in the run position, and the starter relay gets power in the start position. Every circuit got a fuse.

With all of the wires for the Megasquirt run into the cabin, I mounted it in the passenger footwell.

And then finally,
Power Transmission
How does one get all of the twisty, turny good stuff we call torque from the exit of the transmission into the rear wheels? Well luckily the stock M3 axles are beefy and the M3 differential is a limited slip, so those need no upgrades.
The internet told me that a stock V6 Mustang driveshaft would fit my transmission and naturally be the perfect length without modification. Jags That Run sells a flange that converts the BMW differential flange into a standard 1310 u-joint. The Mustang driveshaft uses a 1330 flange, so I bought a 1330/1310 conversion u-joint to mate the JTR flange and Mustang driveshaft.
After buying the wrong driveshaft on my first try (the automatic and manual V6 transmissions use different yokes, it turns out), I had the right driveshaft. Except when I went to install the driveshaft it was too long. Oops, tripped up by the ’94/’95 V8 bellhousing again. It’s about 5/8″ deeper than the ’93 and earlier unit that most people use, so it makes the stock Mustang driveshaft about 1/4″ too long to fit between the transmission output and the differential flange.
Partially due to frustration and partially due to totally wrecking the conversion u-joint by installing it with a hammer and no lube (write your own joke for that one), I gave up trying to make it work on my own and took everything to a local driveshaft shop. I gave him the driveshaft, the JTR flange, and my measurements. A couple of weeks later I had a complete driveshaft capable of holding enough power that the shop owner scoffed when I told him my eventual power goals were at most 400hp.


One alternative to paying out the butt for a custom driveshaft is having the Mustang transmission-side flange and yoke welded to the stock BMW driveshaft set at the correct length. About $43 for the yoke plus the cost of cutting and welding the stock shaft would cost less than a $75 stock Mustang driveshaft and $100 JTR adapter flange. It would also be less than a $250 custom driveshaft with a yoke from a $75 driveshaft after buying the wrong $75 driveshaft first and still needed a $100 differential flange. Not that I’d know anything about that.
That’s it. You now have a V8 M3. Piece of cake, right?

Fünf Null Part XII: Post-Swap Engine Mount and Exhaust Upgrades –or- “It Never Ends”
Mikael, Where did you cut that hole at for the ms cable pass through? Currently running with mine in the stock ecu and it’s a pain if I need to tune or check anything. Also just a note I struggled with the throttle cable thing then talking to some hot rod guys found out about lokar universal throttle (lok-tc-1000RJ36U) cables, Bit more elegant of a solution lol.
I found a punchout on the passenger side below the stock ECU slot. I think I actually drilled it a bit bigger, but it was down there somewhere near the top of the carpet. Great tip on the throttle cable!
Where can I find motor mount brackets? Or at least specs to build some?
I’m wanting to 5.0 swap my e30 but I’m finding little to no info on it. I honestly just need to find motor and tranny mounts
would you be willing to sell mounts? i don’t have access to a welder and have been looking for the past year for mounts for my 302 to e36 vert
I don’t have any kind of fixture or measurements for the mounts – your best bet is to find a maker space with a welder or make friends with someone that can weld. Or maybe find a cheap flux core welder and go for it on your own!