Welcome back to another episode of This Old, Dilapidated, Beat-on, POS Car. Last time we assembled and wired up the ECU with a little help from our good friend Mr. Soldering Iron and his accomplice Toxic Lead Vapors. This week we’ll walk through how to mate a burly, brutish American engine with the lithe, willing German body of an M3.

Fünf Null Part IX: The Final (ECU) Solution –or- “Das Megaspritzen”
As an Amazon Associate I earn from qualifying purchases.
There are seven major systems that need to be integrated between the BMW chassis and the Ford engine: Fuel, Exhaust, Cooling, Instrumentation, Controls, Electrical, and Power Transmission. I’m going to break each one of them down harder than a b-boy busking for his dinner.
Fuel
The BMW has a return-style fuel system with the filter and regulator hidden behind a cover that’s under the car, roughly beneath the driver’s footwell.

Step one was snipping the blue plastic line. That normally goes from the fuel tank to the engine bay and is part of the emissions equipment – fuel vapor from the gas tank goes into a canister in the engine bay that the ECU occasionally empties into the intake while the engine is running. I capped it with this 3/8″ filter that lets out vapors without letting junk in.

Next, I pulled off the stock BMW regulator assembly and used some 5/16″ FUEL INJECTION RATED fuel line with FUEL INJECTION SPECIFIC hose clamps to connect the stock fuel feed and return lines to the stock Ford quick-disconnects.


The Ford fuel line has steel braid on the outside and a stiff plastic liner. I heated the plastic liner with a heat gun and pressed in a 5/16″ barbed splicer which allowed me to clamp on the new rubber fuel line.

The Explorer used a return-style system through 1998 so my setup is compatible with the stock E36 configuration. In ’99, Ford switched to a returnless system which can be reverted to a return-style by simply swapping in a return-style fuel rail, though you may want to check injectors as it’s possible the return-style were different than the returnless.
To complete the fuel system, I wired the Megasquirt’s fuel pump relay output to the brown/green wire in the under-cowl wiring box that activates the stock fuel pump relay. Maximum fuelage with minimum chance of a 40psi gasoline-powered flamethrower.
Exhaust
This was actually pretty fun. Whoever pulled the V8 from its former home found one of the exhaust bolts frozen in place and instead of fighting it, just Sawzall’d the exhaust after the flange. This worked in my favor because hey, free flange.

I was able to cut off the stuck bolt and drill out the remaining bolt shaft, leaving me with half the required number of flanges. I took the flange to a local exhaust shop and they were able to form an identical flange piece in a couple minutes for $10 or $20.

Since I only had one clamp (the part that bolts the flange to the exhaust manifold) I had to make a second. I used my plasma cutter to cut out some 3/16″ plate in the rough shape of the clamp with a 2.25″ hole for the exhaust tubing. Then I reinforced each side with some 1/8″ strip.


With the stock exhaust manifolds in place, the driver’s side exhaust shot straight down under the steering shaft.

And the passenger side exhaust pointed straight back at the frame rail/firewall.

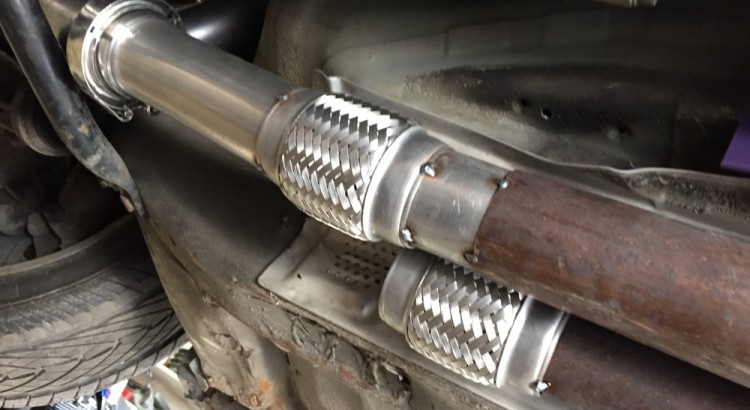
To get the exhaust gasses and glorious V8 noises from the manifolds to the tailpipe, I ordered some 2.25″ mandrel bends: three 180 degree j-bends and one 120 degree bend, all in the tightest radius I could find. I also grabbed a couple of 2.25″ x 4″ flex pipes and a couple of 2.25″ mild steel v-band kits.
On the BMW side, I chopped off the stock exhaust tubing before the cats.

With the manifold flanges in place and the BMW exhaust hung with fresh rubber hangers, I cut up and spliced together the bends to mate the two systems together.


I later wrapped the exhaust pipe where it goes near the oil pan to prevent it acting as an oil pre-heater.

With the exhaust fully tacked up, I dropped the assembly off the car and fully welded everything.

I used a step drill bit to drill a hole in the driver’s side pipe, then welded on an O2 bung for the wideband O2 sensor.

Complete exhaust:

Complete with moody early-morning light. #nofilter #killme
Cooling
The E36 in stock form tends to have more cooling issues than a Ukrainian power plant in the ’80s. At some point, it looks like my car got a full cooling system refresh, as the M3’s original engine had an upgraded aluminum water pump housing and the radiator had a sticker on it dated 2008. I stuck with the stock radiator, but if I was going to go aftermarket, I’d grab this aluminum radiator from Summit – a 2-row radiator of the correct dimensions with the inlet and outlet on the correct sides for the 5.0.
With the radiator and engine in place, I took some Molex 120V house wiring and bent it into the approximate shape I’d need for cooling hoses. Then I headed to the nearest auto parts store and asked if they’d let me behind the counter to shuffle through their selection of hoses. I picked out a couple that looked like they had the bends I’d need, then I went to work fitting everything up.

Once I had the hoses pointing at each other, I cut up some 1-5/8″ OD aluminum tubing to link the rubber hoses.
To make sure the water pressure wouldn’t blow a hose off of the tubing, the tubes needed a lip. I could buy a tool to roll a lip into the tubing, but by now you should have figured out that I’ll pick the more difficult, lower quality but marginally cheaper way every time. I grabbed an old pair of vice grips and cut a notch out of the lower jaw with a grinding wheel. Then I grabbed a 1/4″ thick steel spacer, sliced out the top quarter, ground a nice curve onto the bottom half, then welded it onto the vice grips. After a few passes around the tubing, tightening the jaws with each pass, voilà.

The tubing connected the hoses nicely:

And got clamped in place.

The other side of the cooling system is the heater hoses between the engine and the car’s interior heater core. The stock heater control valve had to be moved so it wouldn’t interfere with the driver’s side valve cover/coil bracket, so I made up a bracket and bolted it to the firewall on the passenger side of the car.


To determine how to route all of the hoses, I nabbed this beauty of a diagram making the rounds on Bimmerforums.

I grabbed a bunch of 5/8″ and 3/4″ heater hoses, couplers, and elbows, and connected the firewall outlets over to the heater control valve.

I ended up with three hoses and all sorts of wonderful potential leak points. Since then I’ve discovered pre-made 90 degree heater hoses like this 5/8″ hose and this 3/4″ hose that would greatly reduce failure points.

I mounted the stock BMW coolant tank on the driver’s side in front of the engine using a bracket mounted to the stock cruise control module bracket (that was kind of a mouthful).

And finally, of course the stock BMW fan was DOA, so I grabbed an electric fan from a Volvo at the junkyard. Turned out it slipped right into the BMW shroud, requiring only a couple of holes drilled in its surround to match up with the BMW mounting points.

The Megasquirt only natively supports a single cooling fan, so I wired the low-speed power wire from the body to the high speed input of the fan and hooked the Megasquirt up to the low speed fan relay. It is high speed or nothing, matching the goal of the car itself.
Instrumentation
I’m not a doctor, but I assume after a heart transplant, doctors monitor the patient’s pulse and blood pressure for a least…like…a few minutes. Similarly, it’s important to me that I be able to monitor the engine’s health as I drive, especially when I’m working out the initial bugs.
Oil Pressure
As mentioned in the engine prep article, I installed a 0-100psi oil pressure sensor onto the engine. I wired it to one of the Megasquirt’s inputs and calibrated it. Then I wired one of the Megasquirt’s outputs to the brown/green wire in the under-cowl wiring box that leads to the instrument panel’s oil pressure warning light. The MegaSquirt was then set up with an oil pressure vs. RPM curve that will light the warning light if it’s out of range.

Check Engine Light
The Megasquirt has a configurable check engine light that can be turned on for any number of reasons, including excessive noise in signals, low oil or fuel pressure, low or high air/fuel ratio, and much more. I wired a Megasquirt output to the gray wire in the under-cowl wiring box that corresponded to the instrument panel’s check engine light.
Tachometer
The Megasquirt reads engine RPM off of the crank and can drive a tach. I connected the Megasquirt output to the solid black wire going into the instrument panel that corresponded to the tach input. Starting with firmware version 1.4.0, the Megasquirt is able to scale its tach output to match whatever number of pulses any stock tach input expects, so getting the tach to read accurately is a piece of cake.
Speedometer
The stock BMW speedometer is read off of the rear differential, so the speedo doesn’t care that you’ve defiled the car with a “schmutzigen amerikanischen motor.” Because my T5 is from a later V6 Mustang, it has a VR sensor on the output shaft that the Mustang uses for its speedometer input. I wired that sensor up to the Megasquirt to enable speed indication in all of my datalogs, not to mention the potential for launch control, traction control, and more.
Coolant Temperature
The stock Ford coolant temperature sensor is wired into the Megasquirt, which already has the sensor’s profile as a preloaded option. The stock BMW sensor is in the radiator and could be run to the instrument panel as stock, but the US-spec coolant gauge is famously useless, showing basically the same needle position for something like 160-220 degF, making it useless. I can read actual temperature in the Megasquirt so I ripped out the stock coolant gauge to install an…
Air/Fuel Ratio Indicator
I bought an Innovate MTX-L wideband setup that included the O2 sensor and air/fuel gauge with built-in wideband controller. I ripped the guts of the gauge out of its container. I pulled the instrument cluster out of the car and used a razor and a Dremel to remove any trace of the coolant gauge.

I put the wideband’s gauge face on the front of the cluster face.

I pressed the guts of the gauge against the back of the cluster face and used a few small machine screws to hold them in place.


A test fit of the face into the assembly looked good.

So I installed it into the car.

That covers most of the basics for instrumentation, though the Megasquirt has a lot more to offer. Here’s a sneak peak of plans for the next stage…

Next time we’ll finish up and cover Controls, Steering, Electrical, and Power Transmission. Stay tuned.

Hello, love Your vids and info. Im am doing a similar swap: 1970 sbc-350ci w/ turbo 350 trans into a 2001 325i. I really need some insight into this project so i was hoping we could talk one day. I know it sounds crazy to ask as You don’t me from a whole in the wall and lots of people probably want the same thing but You never know till You try.
With that being said, here’s my name/#: Stephen Roberson/xxx.xxx.xxxx. Hope fully we can speak soon. If not email would be fine. Thanks for Your time!