The internet is simultaneously home to an unfathomable wealth of information without limits and few good men that can appreciate that fact. Trusting something the internet tells you is risky business, far and away from a safe bet. But here I was, despite what the others said, about to try and fit a legend of an American V8 engine into a BMW M3; you don’t have to be Rain Man to know what a cocktail of bad ideas that would be, but I was on a mission. Impossible you say? I’m losin’ it? Until somebody taps me on the shoulder and shows me the color of money, I’m going to keep my eyes wide shut, breathe in the scent of fresh magnolias, and fall off the edge of tomorrow into oblivion. Tropic Thunder.

Fünf Null Part VII: Replacement Engine Prep –or- “Port and Polishing a Turd”
As an Amazon Associate I earn from qualifying purchases.
To prepare the engine bay to receive such a voluminous package, a few things were necessary. Sidenote – I realize that the potential for innumerable hilarious sex puns in this post is astounding, but for the sake of decency, I’ll abstain.
The entire front end was still removed from when I previously assumed the service position to get the old engine out. This made preparation and test fitting extremely easy.

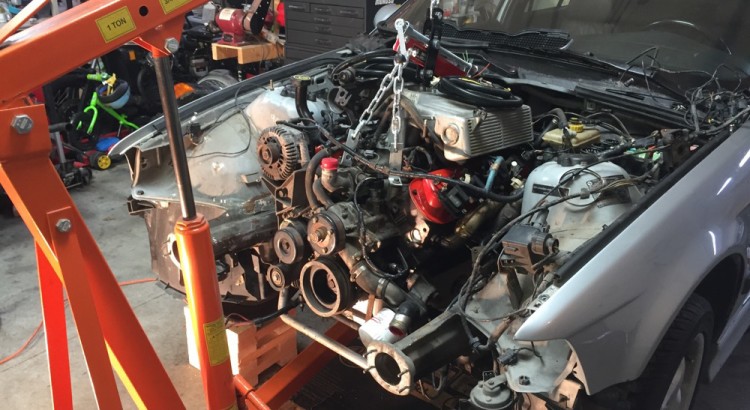
I erected the hoist, raising the engine and transmission high enough to glide right into the transmission tunnel, dodging any barriers in the process.

It was the first test fit, so I took it slow and easy to make sure I didn’t hurt anything.

We have contact!

But how tight is it? Check out the exhaust manifold-to-framerail clearance:


And the other exhaust manifold-to-steering-shaft clearance; the shaft needs plenty of room to move around:

Oil pan to crossmember clearance:

The shifter came up a couple inches short of the hole, but it was nothing that a little creative thinking couldn’t solve:

In fourth gear with the stock Mustang shift lever installed:

The engine basically positioned itself. This location allowed the use of the stock Explorer exhaust manifolds without frame rail or steering shaft interference, the hump in the oil pan sat perfectly over the subframe and steering rack, and the transmission landed nicely in the tunnel without any banging required. So with the engine held in place by the hoist, why not fix it there permanently?
I got a set of E30 rubber engine mounts and installed them onto the E36 subframe. Then I bought a 20′ stick of 3/16″ thick by 4″ wide steel from a local supplier with free delivery (no #TeamHatchback pic necessary this time), and got to work. The stock Explorer mounts were very beefy and had the engine-side mounting solution down, so I worked from there over to the subframe, cutting off any parts of the mount unnecessary for strength.
Passenger side:


Driver’s side, with a little more step-by-step detail:


With the engine held in place, I could set the transmission where it needed to be. Tremec has a nice app that lets you measure drivetrain angles to make sure none of the u-joint angles will be beyond what’s acceptable. I tried to use it for like 2 minutes then gave up and just set it in place at what appeared to be a reasonable angle.

Recipe For A Transmission Mount
Start with one whole V6 Mustang transmission crossmember.

Then trim away the excess fat so that only the meat of the mount remains:

Next, use fondant to secure the mount to the transmission (if you don’t have any fondant handy, bolts will also work) and secure some 3/16″ thick by 1-1/2″ angle to the BMW crossmember mounting points in a similar fashion.

Now add four parts 3/16″ steel plate to connect the mount to the angle iron. Hold it in place with either toothpicks or tack welds, whatever is handy.

Now remove the mount from the car and MIG weld all of the joints at 3000 degrees Celsius for about 10 minutes.


Test fit it in place. Remember: Presentation is 90% of function, so make sure it looks good.

The exhaust manifold ended up pretty close to the steering shaft and its rubber damper:

So once the engine was back out I swapped out the girthy E36 shaft for an E46 unit for its smaller diameter, giving me an extra 1/4″ or so of clearance.

Ribbed for everyone’s pleasure.
I ripped the old, moist, sand-and-road-debris-impregnated heat shielding off of the firewall and replaced it with some new stuff.

I very carefully (as you can see) adjusted the shifter hole size and location to more comfortably fit the new transmission.


And put a glorious hole in the firewall for running all of my ECU wiring and the MAP sensor line.

With the mounts finalized, it was time to get them painted with some high temp paint to cover the bare metal – always use protection.

Some of you that remember my valve cover color may see where I’m going with this, but I also needed to protect the bare steel oil pan, so I painted that, too.

Given the odd spark plug orientation of the GT-40P heads and the intrusive exhaust manifolds, even the longest stock LS plug wires I could find couldn’t get the job done without uncomfortable rubbing – every inch matters and these dudes came up short.

So I grabbed some 45 degree LS coil boots, some 135 degree spark plug boots and a spool of wire (in the proper color, of course) and got to work.

And with that, the engine was mechanically ready to get busy.

Fünf Null Part IX: The Final (ECU) Solution –or- “Das Megaspritzen”