It was February of 2009. I’d been at my first real big boy grown up job for about a month and had recently received my first real big boy grown up paycheck. With some cash burning a hole in my pocket and since I was in “training” still at work (training = “Here read this stack of manuals, you have a month…or two…or whatever”), obviously most of my time was spent cruising Craigslist for motorcycles. Amidst all of the $25,000 Harleys and $10,000 sportbikes, I found the perfect listing – something I could pick up with the first paycheck’s leftovers.
It was two bikes – a 1976 CB550 that “just needed a carb clean” and a 1983 Nighthawk 550 that “just needed a new starter”. Asking price for the pair was $700. Fortunately, my sister and her boyfriend were planning on being in town that night with his pickup for an event he was attending, so I borrowed it from him and headed off with my sister to Stuart, Iowa.
After the requisite tire-kicking, I offered the dude $600 for both bikes and he took it. So we heaved both bikes into the back of the truck and “secured” them both with a single ratchet strap through each bike’s handlebars. During the drive home, my sister was in charge of watching out the back window to make sure I didn’t lose a bike.
Once home, I looked over what I’d gotten myself into this time:

Yikes.


Double yikes.


Triple yikes.
Okay, so a little rough to start with, but I had a VISION. A vision of a totally sweet café racer with swoopy pipes and brash colors and great handling and low bars. But before that vision could be pursued, I had to make sure the bike would actually run.
I got the carbs completely cleaned up and rebuilt, threw them on the bike, changed the oil, and put the tank back on, only to watch fuel run out of the vacuum vents and carb intakes. After turning the petcock off and cleaning up the spilled fuel, I cranked the bike over a couple times and fired right up. It revved nicely and felt and sounded like all cylinders were firing. Score.
Step 1: Ditch the fairing, tack on a headlight, filter the air going into the engine, drop the handlebars.

Looking a little better already, and I could actually ride it around to make sure the carbs were dialed in with the (gasp) pod filters.

Step 2: Swoopify the exhaust and build a new seat.


We’re starting to see the bike take shape. What’s next?
Step 3: Add totally sick knee cutouts to the tank without actually cutting into the tank.


With all of the mockup work done, it was time for…
Step 4: Teardown.
This seemed like the easiest way to pull the engine from the frame.


With that done, I could weld in a new rear support and then clean up and paint the frame.


The swingarm, centerstand, brake arm, and kickstand all got coated in a satin black.

And the wheels got hit with gloss black.


As did the triple clamps and headlight ears.

Which put me at…
Step 5: Polishing the aluminum bits.
I started by wetsanding with 800 grit sandpaper, then polishing using a drill-mounted buffing wheel and a couple different grits of polishing compound.


For extra bonus race points I drilled the front brake rotor. I modeled the rotor in Autodesk Inventor and used its pattern feature to draw up the holes. Then I printed it out on an 11×17 sheet of paper, laid it on top of the rotor and centerpunched each hole location:

With all of that done, it was on to…
Step 6: Put that shiz back together

Rebuilt the forks with new seals, dust covers, and fluid. Repainted the brake caliper.

I had new tires mounted by the local Honda dealership and applied some fancy rim stripes for that color-matched goodness.


Then on went the chopped front fender up front and CB900F shocks out back.


And I tossed on a new headlight and turn signals.


I used a 35W HID that proved plenty bright.

Then on went the stainless steel brake lines (color matched!!) and exhaust:

And while I was at it I dropped in the camshaft from the SOHC CB650 for some extra horsepowers.

Which put me at…
Step 7: Finishing touches:
Slapped some paint on the tank and seat:


I made up some new gauge faces and backlit them with LED rings:


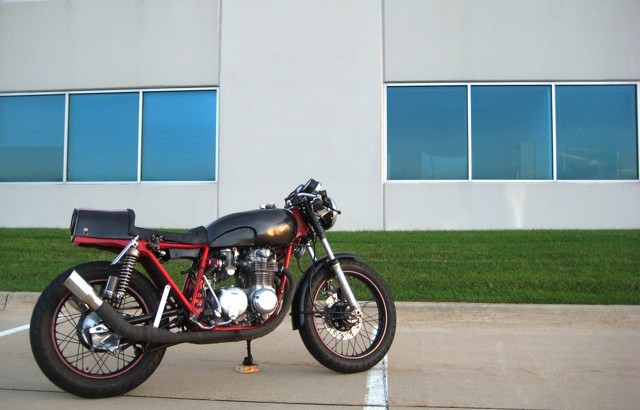
And with that, it was done.


The whole build took about a year and a half, working on it when possible; I bought and sold a couple of other bikes in the meantime.
This one got ridden around the block a few times and then immediately put up on eBay – though nice to look at, I very quickly discovered that bikes like this are a pain to ride and totally not what I’m into. The final auction price was $2250 – I didn’t keep close track of my expenses on this build as it happened over such a long period of time, but when I did the approximate math out of curiosity, I basically broke even or came out maybe $100 ahead. Onto the next project!
Awesome restoration/build man.
Those custom gauges look mint. Any more details on how you did those?
Disassembly is easy if you’re careful, the process is well documented. I sanded off the stock faces and then designed the new faces in Photoshop. I printed the new faces, and rubber cemented them onto the gauges, then reassembled with the LED light rings in place.